Optimizing PCB Testing with the Latest 3-Element Stacked Rosette Strain Gauge Technology

Optimizing PCB Testing with the Latest 3-Element Stacked Rosette Strain Gauge Technology

As the demand for thinner, smaller, and more densely populated PCBs increases, Micro-Measurements' new G1350A perfectly fits the bill for evaluating PCBs' stress. Thanks to the flex circuit and pre-attached lead wires, it features a compact design and significantly simplifies the installation process.

A stacked rosette strain gauge is a particular strain gauge designed to measure the typical strains along different directions at a single point. A regular strain gauge measures the deformation or strain of a material in one direction. In contrast, a rosette strain gauge, composed of multiple strain gauges, can measure strain in multiple directions. A stacked rosette strain gauge consists of several individual strain gauges stacked on each other, each oriented in a different direction to measure the strains in various directions at a single point. The stacked rosette configuration allows for a more compact design compared to a planar rosette, where the gauges are arranged next to each other.

Usage on Printed Circuit Boards (PCBs):
  • Quality Control: During the manufacturing of PCBs, there may be internal stresses generated due to various processes such as lamination, soldering, etc. These stresses may lead to the PCB's warping, bending, or even cracking. Stacked rosette strain gauges can measure these internal strains at critical points on the PCB to ensure they are within the permissible limits.
  • Design Validation: During the design phase of PCBs, engineers use finite element analysis to model and predict the strains and stresses that the PCB will be subjected to during its operation. By attaching stacked rosette strain gauges to the prototype PCBs and subjecting them to real-world operating conditions, engineers can measure the actual strains experienced by the PCB and compare them with the predicted values from the model, helping in validating the design and making any necessary modifications before mass production.
  • Failure Analysis: When a PCB fails during operation, it is essential to understand the cause of the failure to make necessary design modifications and prevent similar failures in the future. Stacked rosette strain gauges can be attached to the PCB at locations suspected of experiencing high stresses or strains. By subjecting the PCB to the operating conditions that led to the failure, engineers can measure the strains at these critical points and determine if they were the cause of the failure.
  • Thermal Expansion Measurement: PCBs often have components that generate heat during operation, which can cause thermal expansion of the material. This thermal expansion can lead to mechanical stresses and strains on the PCB and its components. Stacked rosette strain gauges can measure these strains accurately and help design PCBs that can withstand these thermal expansions without failure.

Micro-Measurements' G1350A Features:

  • Round shaped to facilitate spot installation.
  • Minimal form factor of 5.1mm diameter.
  • Readily available resistance values: 120 ohm (C4A) + 350 ohm (C4K).
  • Flex circuit connection for the most flexible and comfortable gage installation (50mm and 300mm).
  • Pre-attached lead wires: 1m or 3m length, 2 or 3 wire configuration.
  • Highly compatible with StrainSmart® software for PCB testing application features.
AP Corp.
(508) 351-6200


4Sight2 from Druck - Easy-to-Use, Cost Effective and Scalable Calibration Management

4Sight2 from Druck

Instrument calibration stands as a critical activity in process control industries. It ensures that the tools and devices used to monitor, measure, and control various processes deliver accurate and reliable results. The value of this activity, foundational to production quality, safety, and efficiency, is irreplaceable.

When we speak about guaranteeing quality, instrument calibration takes center stage. Industries like chemical, pharmaceutical, food and beverage, and oil and gas depend heavily on precise measurements to produce consistent, high-quality products. A pharmaceutical company, for instance, cannot afford slight deviations from specified parameters as they could lead to non-compliance with standards or the production of ineffective drugs. Regular calibration of instruments, therefore, forms an essential part of quality control.

Instrument calibration also plays a significant role in maintaining safety, becoming extremely critical when industries work with hazardous substances or high-risk processes. For example, a chemical plant's incorrectly calibrated pressure sensor could lead to over-pressurization and dangerous incidents. In this case, regular calibration can reduce the risk of equipment failure and the associated hazards, thus providing a safer environment for the facility and its workers.

Furthermore, the calibration of instruments can enhance operational efficiency. Instruments delivering accurate readings minimize the likelihood of process anomalies, downtime, and product waste, contributing to the efficiency of operations. By detecting and correcting inaccuracies early on, industries can avert expensive repairs or replacements and potential penalties from regulatory bodies for non-compliance.

4Sight2 from Druck, a Baker Hughes business, offers easy-to-use, cost effective and scalable calibration management  that is equally effective for single use or global multi-site operations. This configurable software is designed to Empower Your Organization to Operate Simply and Securely, connecting your people to instruments, data and enhanced analytics.

With purchase of a new Druck Freemium documenting calibrator you are entitled to a free 4Sight2 Lite license. This hardware + software solution automates your calibration process at no extra cost. Using your free 4Sight2 license with your portable calibrator can achieve:
  • Error proof & time saving calibration management
  • Up to 40% cost savings
  • Asset management tools
  • Calibration certificates, compliant and audit-ready data
  • Fully paperless and traceable
  • Truly global in multiple languages
For more information about Druck products in New England, contact AP Corp.
https://a-pcorp.com
(508) 351-6200


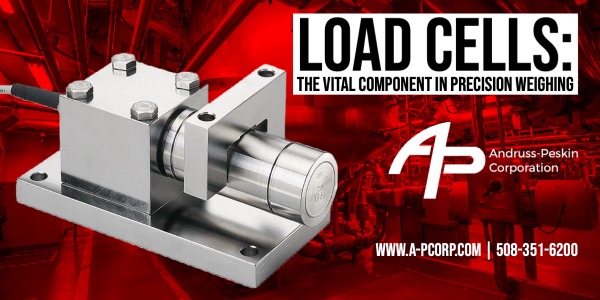
Load Cells: The Vital Component in Precision Weighing

Load Cells: The Vital Component in Precision Weighing

A load cell is a transducer or a sensor that converts force into an electrical signal. In industrial weighing applications, it's a critical and core component used to measure weight or force.

The most commonly used types of load cells in industrial applications are strain gauge load cells, which work on the principle of piezoresistance. When a load or force is applied to the strain gauge, it deforms or changes shape. This change in shape causes a measurable change in the electrical resistance. The change in resistance is proportional to the load applied, meaning the more significant the load, the larger the change in resistance.

This change in resistance is usually minimal, so it's converted into an electrical signal using a Wheatstone bridge configuration. The signal is then amplified and converted into a digital form by an analog-to-digital converter. This digital signal can be interpreted and displayed on a readout device, such as a digital display or a computer.

In industrial weighing applications, load cells are ubiquitous, with applications including weighing scales, industrial scales, batching scales, and load-testing machines. They can measure loads ranging from tiny (a few grams) to large (hundreds of tons).

Load cells are robust and reliable, capable of withstanding harsh industrial environments. They can handle extreme temperatures, high levels of vibration, and other challenging conditions. Additionally, they offer high precision and accuracy, which are critical in many industrial applications.

In addition to their use in weighing, load cells measure tension, compression, and shear forces, making them versatile tools in many industrial processes. They play a significant role in quality, inventory, and process control in various industries, including manufacturing, agriculture, food processing, pulp & paper, power generation, transportation, and construction.

BLH Nobel is a leading weighing and force measurement solution provider, including load cells, weighing modules, and process control equipment. The company is renowned for delivering precision, reliability, and durability, particularly in harsh industrial environments.

KIS Weigh Modules, adeptly deployed on dynamic process vessels amidst harsh, sanitation-intensive areas, have mastered the art of thriving amidst grime and grit. Their performance remains uncompromised and exceptional, even in the most challenging conditions riddled with corrosive acids, potent industrial cleaning agents, acidic vapors, and abrasive granulated powders.

Part of the remarkable performance of the BLH Nobel KIS is its ingenious cylindrical design. KIS beams can be maneuvered within the module's infrastructure, aligning precisely with the direction of the applied weight. The modules feature cylindrical, electro-polished stainless steel, forming an almost friction-free surface, allowing the module yoke to glide effortlessly during thermal expansion and contraction periods.
 

(508) 351-6200

Breathing New Life into Aging Machinery: Reconditioning and Modernizing Your Plastic Injection Molding and Extrusion Equipment

Breathing New Life into Aging Machinery: How to Recondition and Modernize Your Plastic Injection Molding and Extrusion Equipment

Reconditioning of plastic injection mold and extrusion machines is a process that involves restoring or upgrading the machine to improve its performance, efficiency, and lifespan. This process can include replacing worn-out or outdated components, updating control systems, and enhancing the overall functionality of the machine. Key elements to consider for reconditioning are control systems, HMI (Human-Machine Interface), pressure sensors, temperature sensors, and feed screws. Here's a list of items to consider when reconditioning these machines:


  1. Inspection and assessment: Begin by thoroughly examining the machine to identify worn-out or damaged components, as well as outdated control systems and sensors. This assessment will help you determine the necessary upgrades and replacements needed.
  2. Disassembly: Carefully disassemble the machine, taking note of the locations and orientations of each component for reassembly later. Clean each part to remove accumulated debris and contaminants.
  3. Control system replacement: Remove and replace the existing control system with a modern, programmable system that offers improved performance and efficiency. This new system should be compatible with existing hardware and allow for seamless integration with the machine.
  4. HMI upgrade: Replace the old HMI with a modern, user-friendly interface that simplifies machine operation, monitoring, and control. This new HMI should be compatible with the updated control system and provide enhanced visualization and data-logging capabilities.
  5. Pressure sensor replacement: Replace outdated or damaged pressure sensors with new, high-precision sensors calibrated appropriately and integrated with the control system, ensuring accurate pressure measurement and monitoring throughout the injection and extrusion process.
  6. Temperature sensor replacement: Install new temperature sensors that provide accurate and reliable measurements. These sensors should be compatible with the control system and HMI, allowing for real-time monitoring and control of temperature during the injection and extrusion process.
  7. Feed screw replacement: Inspect the feed screws for wear, damage, or reduced efficiency. Replace them with new, high-performance screws designed for optimal material mixing and flow. Ensure proper alignment and installation to minimize wear and improve overall machine performance.
  8. Lubrication and maintenance: Lubricate all moving parts and replace worn-out seals or gaskets. Perform routine maintenance tasks such as filter changes and cleaning to ensure the machine operates smoothly.
  9. Reassembly: Reassemble the machine, ensuring all components are correctly installed and aligned. Double-check connections and wiring to ensure proper communication between sensors, control systems, and the HMI.
  10. Testing and calibration: Power the machine on and conduct a series of tests to verify proper function and performance. Calibrate the control system, sensors, and HMI to ensure accurate readings and control.


With these core steps, you can successfully recondition a plastic injection mold or extrusion machine, ensuring it operates efficiently and reliably for years.


(508) 351-6200

Stress Analysis With the Use of Strain Gages

Stress Analysis With the Use of Strain Gages

When external loads are applied, stress analysis assesses the internal forces and stresses acting on a material or structure. Strain gages, widely used in this process, measure the deformation (or strain) that occurs when a material experiences stress. The following provides a detailed explanation of how to accomplish stress analysis using strain gages:


  1. Selecting strain gages: The first step involves choosing an appropriate strain gage for the specific application. Consider factors such as the type of strain (e.g., tensile, compressive, shear), the expected magnitude and direction of strain, temperature range, and material properties of the test specimen.
  2. Preparing the surface: Before attaching the strain gauge, clean and thoroughly prepare the test specimen's surface, using solvents, abrasives, or other cleaning methods to remove contaminants, ensuring proper strain gage adhesion to the surface.
  3. Installing strain gages: Bond the strain gage to the test specimen using a specialized adhesive. Align the gage carefully toward the expected stress, accurately positioning the gage grid (which contains the sensing elements) over the area of interest. Once the adhesive cures, the strain gage installation is complete.
  4. Wiring and instrumentation: Connect the strain gage to a data acquisition system using lead wires. This system usually includes a signal conditioner, which amplifies the small electrical output from the strain gage, and an analog-to-digital converter, converting the analog signal into digital data for further analysis.
  5. Calibrating: Calibrate the strain gage and data acquisition system before starting the stress analysis. Apply known loads or strains to the test specimen and record the corresponding output from the strain gage. Create a calibration curve relating the measured strain to the electrical output of the gage.
  6. Applying loads and collecting data: With the strain gage installed and calibrated, subject the test specimen to the desired external loads. As the sample deforms under load, the strain gage also deforms, causing a change in its electrical resistance. This change in resistance is proportional to the strain experienced by the material and can be measured and recorded by the data acquisition system.
  7. Analyzing data: Analyze the collected data to determine the stress experienced by the material. Typically, this involves comparing the measured strain to the material's known stress-strain relationship (e.g., elastic modulus). Depending on the complexity of the loading conditions, finite element analysis (FEA) or other computational methods may be employed to simulate the stress distribution within the specimen.
  8. Interpreting and concluding: Use the stress analysis results to evaluate the material's performance and assess the design's suitability for the intended application, including identifying potential failure points, assessing fatigue life, or optimizing the design to reduce stress concentrations.


In summary, stress analysis using strain gages requires selecting, installing, calibrating, applying external loads, collecting data, and analyzing the stress-strain data to understand the material's response to the applied loads.


(508) 351-6200

The Role of Feed Screws in The Plastics Melt Stream Process

The Role of Feed Screws in The Plastics Melt Stream Process

Feed screws, also known as extruder screws, play a crucial role in the melt stream process of the plastics industry. The melt stream process transforms raw plastic materials into a continuous, homogenized, and viscous molten mass, which can be further shaped and processed into various products like films, sheets, pipes, profiles, and more. The feed screw is an essential component of the extruder machine, the primary equipment used in the melt stream process.


The role of the feed screw in the melt stream process is explained in detail by understanding its different sections and their functions:


  1. Solid conveying (feed) zone: The feed screw consists of a helical channel or flights with a rotating shaft that runs along its length. The screw begins with a hopper where raw plastic material, usually pellets or granules, is loaded. The rotation of the screw transports the raw material forward, creating a solid conveying zone. The screw geometry in this zone efficiently moves the plastic material toward the subsequent zones.
  2. Compression (transition) zone: The depth of the screw channel decreases gradually in this zone, causing the plastic material to compress. This compression generates heat through friction, which melts the plastic along with external heating elements. At the same time, the screw design ensures proper mixing and homogenization of the plastic materials.
  3. Melting (metering) zone: This zone is characterized by a constant channel depth, where the plastic material becomes fully molten. The screw's geometry creates a uniform and consistent melt flow while providing sufficient back pressure to ensure the homogenization of the molten plastic. Additional mixing elements may be incorporated into the screw design to enhance mixing and homogenization further.
  4. Discharge (melt) zone: In this final zone, the screw conveys the molten plastic towards the extruder die, designed to shape the material into the desired product form. A screen pack and breaker plate are typically placed before the die to filter out contaminants and ensure a uniform melt flow.


Feed screws play a vital role in the overall efficiency and quality of the melt stream process. The design of the screw and its various geometries can significantly affect the processing conditions, output rate, and final product quality. Different types of feed screws are available, tailored to the specific requirements of the plastic materials and end products, such as single-screw, twin-screw, and multi-screw extruders. These screws may also be classified based on their compression ratio, screw profile, and mixing elements.


For more information about feed screws, contact AP Corp.

(508) 351-6200

Micro-Epsilon Introduces scanCONTROL AIK Adapter for Cognex® VisionPro® 2D/3D Analysis Software

Micro-Epsilon Introduces scanCONTROL AIK Adapter for Cognex® VisionPro® 2D/3D Analysis Software

Cognex® VisionPro® 2D/3D analysis software is a powerful computer vision software developed by Cognex® Corporation and specifically designed for use in manufacturing and industrial automation applications. This software combines 2D and 3D vision technologies to analyze objects, parts, and components comprehensively.

The software utilizes sophisticated algorithms to analyze images and detect defects or anomalies in manufactured goods. It can accurately measure product dimensions, angles, and shapes and detect even minor defects, such as scratches, cracks, and other imperfections. The software can also compare components and ensure they meet specific quality standards.

Micro-Epsilon released their scanCONTROL AIK adapter for VisionPro® in response to Integrator requests for compatibility with better-performing and lower-cost sensors. Now Integrators can switch directly to scanCONTROL sensors without problems! 

The Micro-Epsilon scanCONTROL AIK adapter for Cognex® VisionPro® (a small software tool) is available for download for free from Micro-Epsilon's download area. The AIK adapter is developed closely with Cognex® and supports all current scanCONTROL models (LLT25xx, 29xx, 30x2, 30x0).

For more information in New England, contact AP Corp. Call (508) 351-6200 or visit https://a-pcorp.com.